Tips For Selecting a Drywall Repair Service Provider

Drywall damage from nails, screws, picture frame hangers, and other fasteners can be patched and made unnoticeable with a little drywall compound and a putty knife.

Once the spackling compound is dry, smooth the area like the rest of your wall or ceiling. Then, you or your interior house painters can paint over it. For more information about drywall repair visit NWA Painter.

Drywall isn’t the toughest construction material on the planet, and it is susceptible to damage from water. Whether it comes from a roof leak or a flood, excessive moisture in drywall can cause discoloration, bubbling, and even mold. If you notice any of these issues, it’s time to call a drywall repair specialist.

Moisture can also lead to other problems with your drywall, including fungi growth and crumbling or flaking. Fungi grow best in damp environments, and prolonged exposure can cause health issues for you and your family. The good news is that there are a few simple ways to prevent moisture issues and avoid needing drywall replacement.

First, keep humidity levels in your home low and clean your drywall regularly. Dust and dirt can trap moisture on drywall surfaces, leading to many problems.

Second, ensure that your walls are properly insulated, and your home’s air vents are not blocked by furniture or other items. Blocking these vents can hinder airflow and encourage moisture buildup, leading to various problems.

Third, check your drywall regularly for signs of water damage. You can do this by using a non-penetrating moisture meter or removing baseboards to look at the studs behind your walls. If the drywall is soft, it’s probably time to replace it.

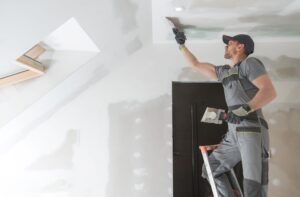
While most holes in drywall can be patched up, large holes should prompt you to have the area replaced. Holes can weaken the structural integrity of your walls, which could lead to a dangerous situation down the road. A drywall repair expert can patch these areas to reduce the chance of future problems. They can also sand and prime the new sections before they paint, making them look as good as the rest of your walls.

Drywall, or gypsum board or sheetrock, is a common building material used in homes of all sizes. But like any other surface in your home, it can get damaged by various factors. If your drywall is damaged to the point that you need to replace it, here are a few tips for selecting a contractor that will provide quality service.

The first step in repairing drywall is to remove any debris stuck to the surface carefully. Next, cut any ragged edges sticking out from the wall using a utility knife or razor blade. This will help protect your hands from cuts if you need to touch the damaged area while working.

Once the drywall has been removed, use your stud finder to locate the studs that frame the damaged area. Then, mark their locations with a pencil so you know where to screw in the new patch or furring strip. Once the area has been repaired, prime and paint the drywall with latex paint to avoid moisture issues in the future.

Cracks and holes in drywall are some of the most common drywall problems. These can be caused by various factors, including the weight of furniture or pictures being hung on the walls, the vibrations from heavy machinery in your home, and even the pressure of your family members’ bodies as they move around. Luckily, these problems are easy to fix.

If the damage is just a small nick or crack, you can often get away with using a spackle to fill in the damaged spot. This type of repair takes only minutes to complete, but you’ll need to wait for the spackle to dry before painting the area.

Larger holes in drywall require a bit more work to repair. First, you’ll need to cut a square or rectangle out of a piece of new drywall that will fit the hole. Then, screw the drywall patch to the existing wall, using long enough screws to penetrate the studs through the back of the drywall and into the wood framing underneath. You’ll also need to tape and mud the seams.

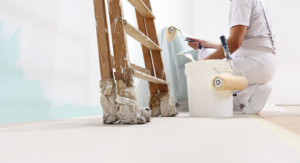
A few dents, scrapes, or holes in your walls can be easily fixed with a little spackle and some touch-up paint. But what about if the damage goes deeper than a few blemishes on the surface of your wall? Drywall repairs can be challenging for even the most stubborn DIYer, especially if you need to know what you’re doing. If you want your repairs to look flawless, a professional contractor offering drywall repair and interior painting services is the way to go.

Correcting the problem as soon as possible if your drywall is damaged is essential to avoid long-term issues. Sometimes, you may need to replace the drywall entirely, especially if there are mold or water damage signs. Mold can be a serious health issue and should not be ignored. Water damage from a leaky pipe or plumbing issue can be equally dangerous for your drywall and should be addressed quickly.

When it comes to fixing drywall, there are three common methods: patching, mudding, and sanding. Most of the time, minor dents and holes can be covered with a small spackle or a lightweight drywall compound that is smoothed and sanded to produce a perfectly unblemished surface. When filing, wear a dust mask or dual-cartridge respirator to protect yourself from the fine gypsum and silica particulates created when sanding drywall.

A mesh drywall patch is usually the best solution for larger holes and damage. These patches are available online or at most hardware stores and look like screens that stick to the wall over the hole. When applying the patch, use a putty knife to apply drywall compound over the entire patch surface and then sand until smooth.

If you’re repairing a large hole, mark the center of the stud with a pencil or chalk line before beginning work so that you can find and locate the stud. The studs are where the utility lines and pipes run, and it’s important to identify them before cutting or drilling into the drywall in case you come across any electrical wires.

Aside from major flooding and water damage, drywall visibly breaking down should be replaced rather than repaired. This is because the drywall may have become brittle, crumbling, or soft, and it’s not a good idea to try to save a drywall sheet in poor condition. Simply installing a new piece of drywall will be easier and faster.

Minor blemishes, such as small holes, dents, or scrapes, are often easy for homeowners to patch. A patch kit usually includes a self-adhesive mesh patch that sticks to the existing drywall and covers the hole. Homeowners can also use a dab of spackle and sand and touch up the interior painting with fresh paint to hide the repair.

Larger holes from banging a doorknob or nails can often be fixed by installing a new drywall panel. Ensuring the replacement is properly anchored to wall studs or ceiling joists is important. The studs and beams should be inspected for damage and any needed repairs. It’s best to work with professionals who know the correct way to anchor drywall to wood to avoid problems down the road.

Hairline cracks in drywall are another type of problem that is generally within the capabilities of most homeowners. These typically appear above and below windows and doors, caused by lumber shrinkage or settling in the house frame. Homeowners can use a drywall knife to sand the crack smooth and apply a thin coat of joint compound with a putty knife. It’s important to use mesh joint tape on the borders of the crack to strengthen the repair, reduce shifting, and help prevent future cracking.

Cracks that are wider than 18″ or those occurring along with sagging walls or ceilings could indicate an issue with the structure of your home and should be fixed by professional drywall installers rather than papered over. It’s important to find the cause of these larger cracks and address it. Otherwise, you risk having the problem reappear over time.

In general, repairing drywall isn’t expensive. However, it’s a job that can be labor intensive. The size of the project can drive up the overall cost, how many rooms are affected, and the type of drywall being repaired or replaced.

Why You Should Hire a Professional to Do Your Exterior Painting

Exterior painting is a huge job that requires the right paint and proper prep. It isn’t an easy project to take on alone, so a professional can make it look flawless.

Many people think interior paint can be used for exterior painting, but that’s not true. Exterior paints have different resins and binders and contain additives like mildewcides and UV absorbers. Visit Website to learn more.

painting services

A fresh coat of exterior paint can protect your home from weather damage and other elements. In addition, it’s an excellent way to add curb appeal to your property. The right exterior paint will help preserve the structural integrity of your home, protecting it against water damage, mold and mildew, pest infestation, extreme temperatures, and everyday wear and tear.

The main difference between interior and exterior paint is the type of resin used to bind the pigments. Interior paints use acrylic latex, a water-soluble material that makes the paint easy to clean up after a spill or splatter. However, exterior painting requires more durable chemicals to withstand heat and cold, rain, snow, and UV rays.

Exterior paints are formulated without rigid binding resins, allowing them to expand and contract as the temperature changes. In addition, they often contain additives to resist fading from sunlight and prevent mold and mildew growth. These paints are also able to withstand moisture better than interior paints, which can crack and peel when they’re exposed to moisture.

Most exterior paints also have a mildewcide, which is a fungicide that inhibits the growth of mold and mildew on the surface of the paint. This prevents the buildup of mold and mildew, which can cause stains and other structural problems. In addition, the fungicide in exterior paints can repel bugs that feed on mold and mildew.

When selecting an exterior paint, look for one that is rated as mildew-resistant and contains added titanium dioxide. This will help prevent the paint from fading and keep it looking new for as long as possible.

Another way to make your exterior paint more resistant to the weather is to use a waterproof sealant on top of the painted surface. This will prevent moisture from seeping under the paint and damaging your siding or masonry.

If you plan to do an exterior painting project, contact a professional painter in your area before the winter starts. They can provide you with the best options for your property and ensure that the job is done correctly. They can also recommend the correct types of paint for your area’s climate conditions and help you pick a color that will complement your home and enhance its curb appeal.

Exterior painting protects your home from weather-related damage, and it adds an element of style that can boost curb appeal. High-quality exterior paints also prevent moisture from infiltrating and damaging your foundation, helping to guard against rot and mold. Regularly applying high-quality exterior paints can also help you spot cracks or deterioration that need repairs before they become major problems.

Exterior paints must withstand huge temperature changes and moisture, as well as resist fading, chipping, and peeling. They must also withstand the constant motion of wind and rain. As such, the resins used in these paints are typically softer than those found in interior paint. This helps them bind to surfaces while also reducing smearing and scuffing.

Different finishes of exterior paint can also impact durability. Eggshell and satin paints have a sheen that makes them easier to clean while still hiding surface imperfections. However, glossier paints are more likely to reflect light, making them more susceptible to glare and showing up dirt and debris. Therefore, it’s important to consider the look you want and your level of maintenance tolerance before choosing a finish.

Oil-based paints can be a great choice for high-traffic areas, but they take longer to dry and are more difficult to clean. They are more durable than latex, but they are also less flexible and can be more prone to chipping and cracking. In addition, oil-based paints are more likely to trap water underneath the surface, resulting in blistering and mold.

Water-based latex, on the other hand, is more flexible and dries faster than oil-based paint. It’s also easier to clean up and safer for the environment than oil-based paint. It’s important to note, though, that even the best paints will eventually wear down. It’s crucial to thoroughly prepare the surface before painting, removing any loose fragments and sanding it down to ensure proper adhesion.

A top-quality paint will last 10 to 15 years or more, depending on the type of material it’s applied to and how often it’s washed. It’s also a good idea to apply two coats of paint rather than just one. The extra layer helps to create a deeper color that’s more resistant to UV rays.

A fresh coat of paint is one of the easiest and most affordable ways to transform your home’s appearance. It’s also durable and weather-resistant, and with a few simple touches, it will last for years.

But if you’re not careful, that paint will fade faster than expected and require touch-ups sooner than you might like. The key is to keep your house clean throughout the year, especially the exterior walls. This will prevent mildew and stains from developing on the surface of your exterior painting, which can lead to more repainting and expensive repairs in the future.

The chemistry behind different paint types is complex. Still, the basic ingredients of interior and exterior paint remain the same: solvents and quick-to-evaporate liquids that keep binders and pigments in suspension. Pigments: Powdered minerals that give paint its hue and opacity. Additives: Control dry time, leveling, and mildew resistance, among other things.

While interior paint needs to be scrubbable and allow for easy cleaning, exterior paint must withstand harsh weather conditions, fading, and even the occasional crack or chip. To ensure your new coat of exterior paint lasts as long as possible, wash and sand the surfaces before applying it.

It’s also important to choose the right kind of paint for your home’s exterior. Oil-based alkyd paints, which are still common in some areas, release high levels of volatile organic compounds, or VOCs, into the air as they dry and cure. These are dangerous for your health and may cause headaches, eye irritation, and other symptoms.

For a safer option, try an acrylic latex paint that’s low-VOC. Elastomeric paint is another option, which includes a layer of liquid rubber for added durability and weather resistance. However, it’s not as easy to use, as you must apply a thicker layer and allow it to cure for up to 72 hours.

A good exterior paint job can add up to thousands of dollars in increased property value, extending the life of the siding and trim and making the home look fresh and new. However, many homeowners feel hesitant to undertake this massive project. This is due to the time, effort, and skill required for a successful outcome. It is also a project that is typically more costly than people realize, especially when high-quality materials are used.

In addition to the paint cost, surface preparation is a major expense for any painting project. This can include sanding, power washing, scraping, patching, and filling holes. This is particularly important for exterior painting, where the surfaces are more prone to abrasion and damage. The use of a pressure washer or sandblaster is recommended for the removal of dirt, mildew, and other debris, which can lead to a smooth and even finish.

The type of paint you choose for your project is another factor that impacts its overall price. The cheapest options are latex paints, which are water-based and easier to clean up than alkyd paints. However, they do not offer the same durability as other paint types. They can also be smeared, chipped, or cracked easily and may fade over time.

Semi-gloss or satin paint is a better choice for durability, as it is more resistant to scratching and staining. However, it is more expensive than eggshell or matte paint. Moreover, it dries with a sheen that can draw attention to dents or other flaws. It is also a poor choice for damp or dusty areas, as it can show up dirt and grime.

While many people can do a simple interior paint job, an exterior painting project requires a much more extensive knowledge of the application process, surface prep techniques, and color theory. It also requires a great deal of strength to move and set up ladders, a steady hand, and some practice to create crisp lines.

It is best to hire professional painters for an exterior painting project to ensure that the work is done correctly and lasts. Professionals will have the skills and equipment necessary to complete the project quickly and efficiently, saving you valuable time and money in the long run. They will also be able to recommend a product that will best meet your needs, such as paint with mold resistance or a lifetime warranty. In addition, they can provide references from previous clients so you can verify the quality of their work.

Interior Painting Techniques

Painting walls can make a dramatic difference in the look and feel of any space. It also keeps out moisture, preventing mold and mildew from forming.

Professional painters possess a lot of institutional knowledge about how to get a crisp, clean look. They do many small things and don’t even think about them because they come naturally to them. Click https://www.alvarezpainting1llc.com/ to learn more.

painting

Using color washing as a wall paint technique is a great way to add texture and visual interest to a space. Typically, the process involves applying a thin layer of paint over a base coat to produce a soft wash effect. It can be used for various looks, from ethereal to dramatic. When painting with this technique, focusing on the brushstrokes is important. Different techniques use brushstrokes differently, so practicing the look you’re going for on a sample board is important before attacking your piece.

To get started, choose a base color for your piece. Then, mix a few different ratios of paint and water to achieve the desired tone. It’s best to start with a lighter shade and then choose a darker hue to achieve the desired contrast. If the colors are too close in tone, they will blend and be less effective.

Once the base coat has dried, apply a small amount of your glaze mixture. Then, using a brush or sponge, sweep the paint over the surface, allowing the bare spots and brush strokes to show. Remember that if you’re using a dark color, it’s important to use a light glaze. Otherwise, the result could be too intense and overpowering.

This technique is ideal for anyone who wants a subtle, aged look. It’s also easy to do, making it a great project for beginners. However, it’s essential to take your time and carefully select your materials to ensure a beautiful finish. For example, use a quality primer like Fresh Start High-Hiding All Purpose Primer and a premium top coat paint, such as easy-to-apply Benjamin Moore(r) Interior or Regal(r) Select Interior Paint.

Professional painters follow certain painting techniques when they are working on interior walls. One of the most important is to clean and wash the walls. That ensures the paint will adhere to the wall and prevent blemishes like blistering and peeling. In addition, washing the surface will remove any dust or grease that may be present. DIY painters often overlook this step, but it’s important to get it right.

Another important step is to sand any rough areas before applying new paint. If you don’t file, the ridges from spackling will show up, making your new paint job uneven. That is also a good time to scrape the walls to ensure they are smooth lightly. Finally, it is a good idea to vacuum the room and remove any items that might be in the way of your paint project.

When you’re ready to start painting, using a roller with a short nap is a good idea – 1/4″ to 1/2″. Longer naps create more stippling on the wall, while shorter ones create a smoother finish. You should also avoid using a foam roller, which can create unsightly lines on the wall.

If you apply a crackling technique, it’s best to use a light-colored base coat and a different topcoat. The crackling effect is more pronounced when the topcoat is applied with a brush, but a roller creates more subtle cracks. Finally, remember to protect the crackling with a polyurethane sealant.

Rinse your brushes and rollers once you’re finished is also a good idea. Most water-based paints clean up easily with warm water and mild soap.

Sponge painting is a quick and simple way to add drama to a room. It requires no special skills and can transform a boring, plain room into something extraordinary. This technique works especially well in sunlit rooms and children’s bedrooms.

Before you begin sponge painting, preparing the walls or furniture by sanding and priming is important. That will ensure that the base coat is even and ready to accept additional layers of paint. Choosing the right type of paint for your project is also essential. Acrylic latex is ideal for sponging, as it dries quickly and allows you to apply multiple colors over it. Other types of paint, such as alkyd, can be used but will take much longer to dry.

The first step in sponge painting is to pour a small amount of your paint/glaze mixture into a paint tray and lightly dab it onto a spare piece of cardboard. That will allow you to test the technique and see what pattern you want to create. Once you have the hang of it, begin sponging on the wall in a random pattern. Use a light touch to avoid smudging or distorting the imprint. If you find yourself applying too much paint, try changing the angle of your sponge with each bounce to make the texture more balanced and natural.

Once you’ve finished the first section of your wall, leave a band of thick glaze at the edge and continue sponging in another three or 4-foot section. Repeat this process until your entire wall is sponge-painted. If you want a more ombre effect, repeat the process with different paint colors and blend them while wet.

Adding a checkerboard pattern to your walls can add visual interest and make them more playful. It’s a relatively simple project to complete and can be done in various colors. Once you’ve finished, it’s important to protect the paint finish by applying a clear sealant or polyurethane coat.

To create the checkerboard effect, you must prepare the wall by cleaning and priming it. That will help the paint adhere to the surface and prevent chipping or peeling. Once the wall is ready, you must mark a grid using a pencil and a carpenter’s level. Make sure that the lines are straight and evenly spaced.

Once you’ve marked out the grid, you can start painting. First, paint the entire wall with a light color. Once the first coat is dry, apply a low-tack painter’s tape strip to the wall along the edge of each grid line. That will ensure that the second color doesn’t bleed under the tape. Next, paint each square with a different color. Make sure that the second color is darker than the first color. When you’re done, remove the tape and touch up any areas where the two colors meet.

If you’re uncomfortable taping off the grid, use a stippling brush instead. This technique gives the wall a softer look at the edges and works well with tone-on-tone checkerboard walls. You can also use chalk to mark off the squares if you don’t mind a more rustic look. That is a great option for rooms with lots of natural light.

There are a few painting techniques that can create beautiful designs on walls. Some of these include rhombuses, Moroccan Trellis, and the Harlequin pattern. These patterns have a special effect that can transform the entire look of your home. However, this technique requires much attention and experience to achieve the best results. Choosing the right color to match your style and personality is also important.

Harlequin is the principal stock character of the Italian commedia dell’arte and was a popular figure in ballets, slapstick pantomime, and other theatrical productions. It is named after the Italian word arlecchino, which means “little harlequin.” Different variants of the name are harlicken, Herlequin, and Helwein (the latter a demon).

The traditional diamond-patterned costume and the black mask accentuating his buffoonery have appealed to artists from the eighteenth century to the twentieth. The character has been portrayed in paintings by Watteau, Van Dyck, and Picasso, among others.

Several fashion designers use Harlequin patterns in their collections, combining them with other geometric and floral motifs for a visual tapestry. Christian Lacroix, for example, incorporates the pattern into high-end fashion, resulting in a bold and artistic aesthetic. Roberto Cavalli, a luxury fashion brand, uses Harlequin in its clothing and wallpapers to add an element of whimsy and luxury to the design.

Several harlequin-inspired interior painting techniques can make your house stand out. One is the rag-rolling technique, which involves rolling a rag over wet paint to create different textures. That is especially effective in small rooms like the kitchen and primary bedroom. Another option is polka dot painting, a simple and easy way to add patterns to your walls. You can concentrate the dots in clusters or distribute them evenly for a more balanced look.